Visualization
An optional pygame renderer draws one env of the batch — or a mosaic of the whole batch — either headless or in an interactive window. It is opt-in, read-only, and off the differentiable hot path: one device→host copy per frame.
uv pip install -e '.[viz]'
Try it immediately
python -m swarp.render.demo                      # interactive window, goal-seeking demo policy
python -m swarp.render.demo --mosaic             # grid of all envs plus a focus pane
python -m swarp.render.demo --model mixed        # heterogeneous fleet, coloured by model
python -m swarp.render.demo --save nav.webm --steps 200
Useful flags: --envs, --agents, --obstacles, --size, --device, --model {holonomic,diff-drive,bicycle,drone,mixed}, --lidar-rays, --lidar-range, --lidar-mode {none,rays,area,both}, --color-mode {agent,model}, --trajectory {none,trail,fade}, --theme {light,dark}, --fps, --step-rate.
From your own code
from swarp import Environment, NavigationScenario
from swarp.render import Viewer, save_video, animate

env = Environment(NavigationScenario(n_agents=5, n_obstacles=2), n_envs=16, device="cpu")
env.reset()

frame = env.render(mode="rgb_array", env_index=0)     # (H, W, 3) uint8 — VMAS-compatible
save_video(env, "nav.mp4", n_steps=200)               # .mp4 (H.264) or .webm (VP9)
Viewer(env, mosaic=True).run()                        # interactive; pass action_fn=policy
animate(env, n_steps=200)                             # notebooks: an inline HTML5 <video>
env.render creates the viewer once and reuses it; extra keyword arguments (size, overlays, mosaic, style, …) are forwarded to it.
Note
env.render only draws — the caller owns the stepping, so the viewer’s pause and single-step controls cannot take effect (they gate Viewer.run’s own loop).
For an interactive window, hand the loop over instead: Viewer(env, fps=20).run(action_fn=policy).
The mosaic
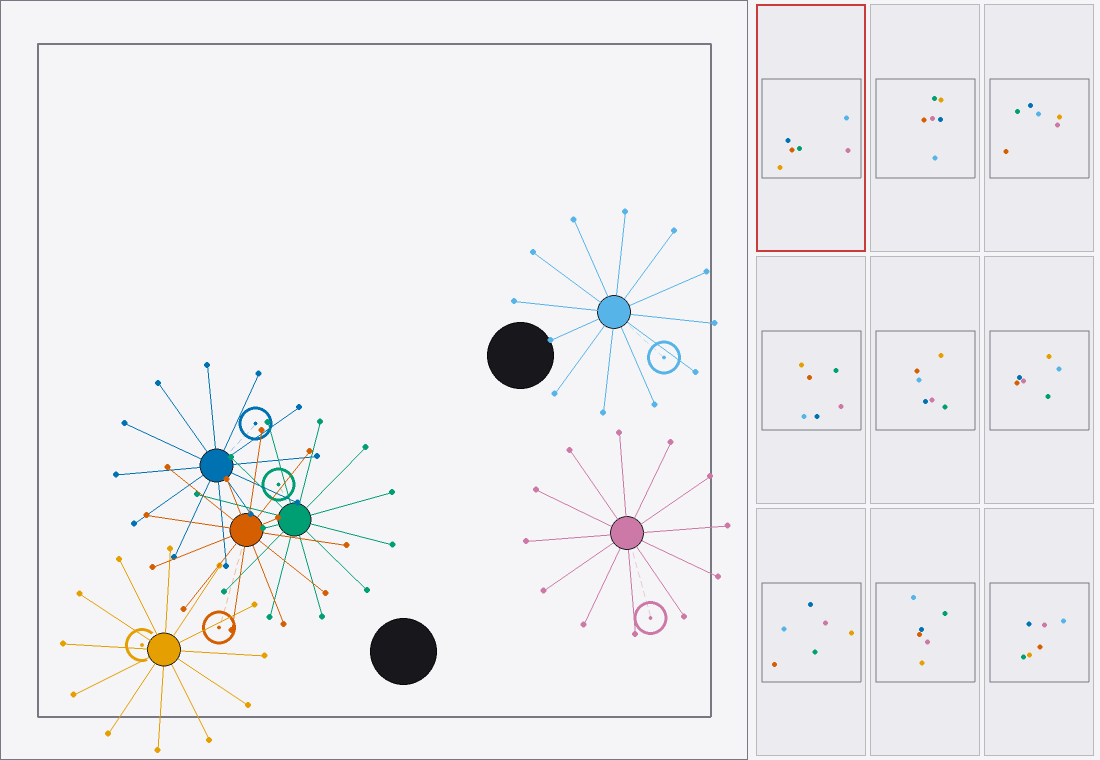
mosaic=True tiles up to max_tiles envs beside a large focus pane. Click a tile to focus it, or step through envs with [ and ].
Controls
key / gesture |
action |
|---|---|
mouse wheel |
zoom |
middle-drag |
pan |
left-drag an agent or obstacle |
move it (writes into the shown env only) |
right-click |
move the selected agent’s goal |
hover an agent |
inspect panel |
|
pause / resume |
|
step once while paused |
|
faster / slower |
|
focus the previous / next env |
|
reset the simulation |
|
cycle trajectory mode |
|
cycle lidar mode |
|
cycle colour mode (per agent / per dynamics model) |
|
resize the window |
|
toggle the controls legend |
|
quit |
Overlays toggle by single key:
key |
overlay |
on by default |
|---|---|---|
|
world bounds |
✓ |
|
obstacles |
✓ |
|
target pose of a movable body |
✓ |
|
goals |
✓ |
|
heading |
✓ |
|
lidar (drawn once a sensor supplies rays) |
✓ |
|
neighbor graph |
|
|
applied action |
|
|
velocity |
|
|
agent ids |
|
|
communication lines |
Interactive write-back (dragging an agent, moving a goal) can be disabled with Viewer(..., allow_write_back=False).
Styling
Style (swarp/render/style.py) holds every colour and pixel size, with Style.light() and Style.dark() as the two themes:
from swarp.render import Style, Viewer

style = Style.dark(color_mode="model", trajectory_mode="fade", trajectory_len=60, supersample=2)
Viewer(env, style=style).run()
supersample renders at a multiple of the target size and downsamples, which is the cheapest way to get clean anti-aliased output for a figure or a recording.
Custom drawables
A scenario feeds its own geometry to the viewer by overriding render_extras:
def render_extras(self, env_idx: int) -> dict[str, np.ndarray]:
    return {"lidar": rays, "comm_lines": links}
Keys are overlay names and values are whatever that overlay expects (CPU-friendly arrays). The core renderer never needs to know about them — this is how the demo scenario draws its lidar rays and communication links.
Video and notebooks
save_video(env, path, n_steps=..., action_fn=..., fps=..., size=..., overlays=..., style=...) streams frames straight to the encoder, so a long episode never has to be held in memory. The container is chosen by extension: .mp4 (H.264) or .webm (VP9); .gif is deliberately rejected.
record_frames(...) returns the frames as a list instead, and animate(env, n_steps=200) records and embeds an HTML5 <video> inline in a notebook.
The screenshots and the clip on this site are generated by docs/make_assets.py, which is a compact worked example of all of the above running headlessly.